
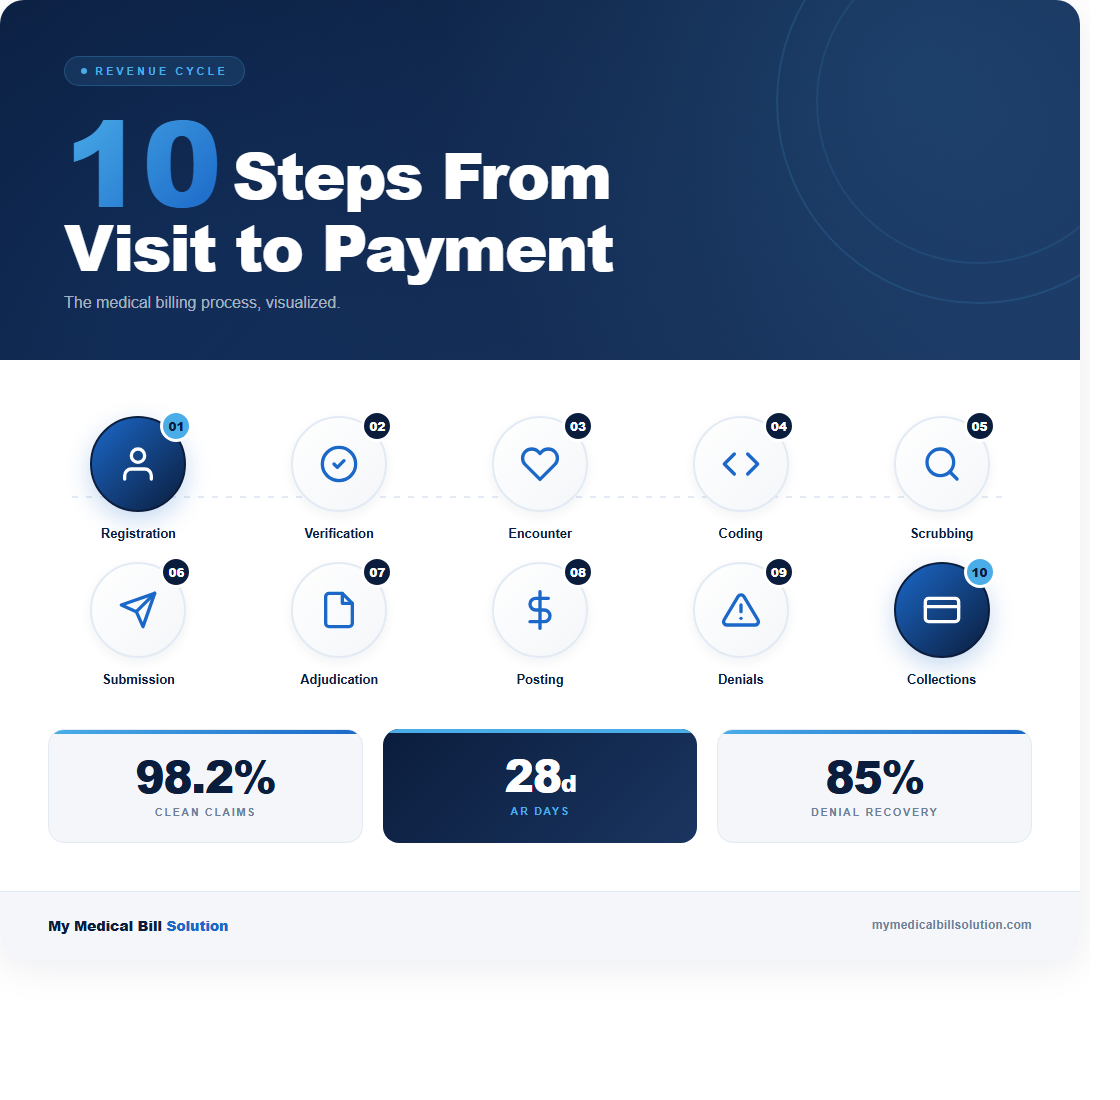
The average medical practice loses between 5% and 10% of its annual revenue to billing process breakdowns. That translates to $125,000 or more for a mid-sized practice, and most of those losses are preventable. The billing cycle has 10 distinct steps. When you understand where each one can fail, you can build checkpoints that catch errors before they cost you money.
Here’s how the full cycle works, step by step, with the failure points and fixes at each stage.
Step 1: Patient Registration
Every billing cycle starts with collecting accurate patient demographics and insurance information. Registration errors cause roughly 30% of claim denials. A misspelled name, a transposed subscriber ID, or an outdated policy number will bounce the claim before anyone reviews the clinical content. Your front desk should verify the patient’s full legal name, date of birth, insurance ID, group number, and subscriber relationship at every visit.
Here’s what to do: build a registration checklist that your team uses for every new patient and reviews at every return visit. Compare the insurance card to what’s in your system. If anything has changed, update it before the patient sees the provider. This single step eliminates the most common reason claims get rejected.
Step 2: Insurance Eligibility Verification
Once you have the patient’s insurance information, verify eligibility and benefits before the appointment. Real-time eligibility checks through your practice management system or the payer’s portal confirm that the patient’s plan is active, that the provider is in-network, and that the service is covered. Skipping this step is how practices end up providing services that the insurance won’t pay for.
Check specific requirements: does this payer require prior authorization? Is the deductible met? What’s the copay or coinsurance? Collecting patient responsibility at the time of service improves your collection rate by 50% compared to billing after the fact. Run eligibility verification at least 48 hours before the appointment so there’s time to resolve issues.
Step 3: Patient Encounter and Charge Capture
This is where clinical meets financial. During the encounter, the provider documents the services performed and the medical necessity for each one. Charge capture is the process of translating what happened in the exam room into billable items. In a typical office visit, this includes an E/M service level (99202 through 99215), any procedures performed, lab tests ordered and completed in-house, and any supplies used.
The biggest failure point here is undercoding. Providers who consistently select a lower E/M level than their documentation supports are leaving money on the table. For example, coding 99213 when the documentation supports 99214 costs roughly $40 per visit. Multiply that by 20 patients a day across 250 working days, and you’re looking at $200,000 in lost annual revenue. Use specialty-specific superbill templates and train providers to document all billable services at the point of care.
Step 4: Medical Coding (CPT and ICD-10)
A certified coder reviews the encounter documentation and assigns the final CPT procedure codes and ICD-10 diagnosis codes. This step requires both accuracy and specificity. The ICD-10 code must establish medical necessity for the CPT code. For example, an EKG (CPT 93000) billed with a diagnosis of “general medical examination” (Z00.00) will likely get denied, but the same EKG billed with “chest pain, unspecified” (R07.9) establishes clear medical necessity.
Coding errors fall into two categories: overcoding (billing for more than what was documented, which is a compliance risk) and undercoding (billing for less, which is a revenue loss). Both are problems. Your coding accuracy rate should be at or above 95%. If it’s not, invest in specialty-specific coding education and regular audits. Review 10 charts per coder per month as a baseline quality check.
Step 5: Claim Scrubbing
Before submission, every claim should run through a claim scrubber that checks for errors. The scrubber validates that all required fields are populated, that CPT and ICD-10 code pairs are compatible, that modifiers are applied correctly, and that the claim doesn’t violate National Correct Coding Initiative (NCCI) bundling edits. A good scrubber catches 90% of the errors that would otherwise result in a denial.
What goes wrong at this stage: practices that skip claim scrubbing or use outdated scrubbing rules. NCCI edits update quarterly, and payer-specific rules change constantly. Make sure your scrubbing software is current and that you’re reviewing scrubber flags before overriding them. A “clean claim rate” below 95% means your scrubbing process has gaps. The industry benchmark is 98% or higher.
Step 6: Claim Submission
Clean claims are submitted electronically through a clearinghouse to the appropriate payer. The clearinghouse performs its own validation and routes the claim to the correct payer. Most clearinghouses return an acceptance or rejection report within 24 hours. A rejection at this stage means the claim never reached the payer, typically indicating a formatting issue, an invalid payer ID, or a missing required field.
Monitor your clearinghouse rejection rate daily. Rejections should stay below 2%. If you see a spike, investigate immediately. Common causes include a payer changing its electronic submission requirements or your system sending claims with an outdated payer ID. Address rejections within 24 hours, because the clock on timely filing starts at the date of service, not the date of submission.
Step 7: Payer Adjudication
Once the payer receives the claim, adjudication begins. The payer reviews the claim against the patient’s benefits, the provider’s contract, medical necessity criteria, and internal payment rules. This process takes anywhere from 14 to 45 days depending on the payer. Medicare processes claims within 14 to 30 days. Commercial payers vary, but most states have prompt payment laws requiring action within 30 to 45 days.
During adjudication, the payer may request additional information. Respond to these requests within 5 business days. Delayed responses are the second most common reason for preventable denials after registration errors. Track where each claim is in the adjudication process using your practice management system’s aging reports, and flag any claim that hasn’t moved in 21 days for follow-up.
Step 8: Payment Posting
When the payer sends the Explanation of Benefits (EOB), your team posts the payment, contractual adjustments, and any patient responsibility amounts. This step requires attention to detail. The allowed amount should match your contracted rate for that CPT code. If the payer underpaid, you need to catch it here, not three months later during a reconciliation review.
Build a fee schedule matrix that maps your top 50 CPT codes to the contracted rates for each of your major payers. When payment posts, compare what you received against what the contract says you should receive. Underpayment rates across the industry average between 7% and 11%, which means if you’re not checking, you’re likely losing revenue on every ERA you process. Flag underpayments for appeal immediately.
Step 9: Denial Management
Denied claims need a structured workflow, not a pile on someone’s desk. When a denial comes in, categorize it by reason code within 24 hours. The most common denial categories are: eligibility issues (CO-27), medical necessity (CO-50), duplicate claims (CO-18), authorization missing (CO-15), and timely filing (CO-29). Each category has a different resolution process and a different likelihood of successful appeal.
Here’s the critical number: 65% of denied claims are never reworked. That represents an enormous amount of recoverable revenue that practices simply abandon. Set a target of working 100% of denials within 48 hours. For medical necessity denials, include the clinical documentation that supports the service. For eligibility denials, verify current coverage and resubmit to the correct payer. Track your appeal success rate by denial category to identify patterns and prevent future denials.
Step 10: Patient Billing and Collections
After insurance has paid its portion, any remaining patient responsibility (copays, deductibles, coinsurance) gets billed to the patient. Patient collections are notoriously difficult. The average practice collects only 50% to 70% of patient balances. Sending the first statement within 7 days of the EOB posting increases collection rates by 30% compared to waiting for a monthly billing cycle.
Offer multiple payment options: online portals, payment plans for balances over $200, and credit card on file programs. Practices that collect copays and estimated patient responsibility at the time of service see 40% higher patient collection rates than those that bill after the fact. The bottom line: don’t wait. Collect what you can at the front desk, bill the rest promptly, and follow up within 30 days. If a balance reaches 90 days without payment, it’s time to escalate.
Putting It All Together
The practices that collect 95% or more of their expected revenue aren’t doing anything magical. They run each step with clear procedures, catch errors before claims go out, and work denials aggressively. Start by measuring your performance at each stage: registration accuracy, clean claim rate, first-pass acceptance rate, days in A/R, and denial rate by category.
If you want a clear picture of where your billing process is breaking down, contact us for a free process review. We’ll map your workflow from registration through collections and show you exactly where the revenue leaks are.